If you have been following the latest trends in the AndroidDev world, you are likely to have heard about Kotlin.
Kotlin is a [not so] new programming language developed by JetBrains - the makers of IntelliJ IDE which the Android Studio is based on. Kotlin is statically typed, it runs on the JVM and offers a lot of benefits. There are tons of articles that talk about the advantages of Kotlin in comparison to Java, so I won’t be covering that in this post.
In this post however, we will learn how to set up Android Studio for Kotlin development and will write our “Hello World” app in Kotlin.
So, yea. Let’s get started!
Install Kotlin Plugin for Android Studio
The good people at JetBrains have created an IntelliJ/Android Studio Plugin for Kotlin. First, we’re going to go ahead and install the plugin.
To do this, navigate to Preferences > Plugins > Browse Repositories and search for “Kotlin” then, click on “Install” as shown in the figure below.
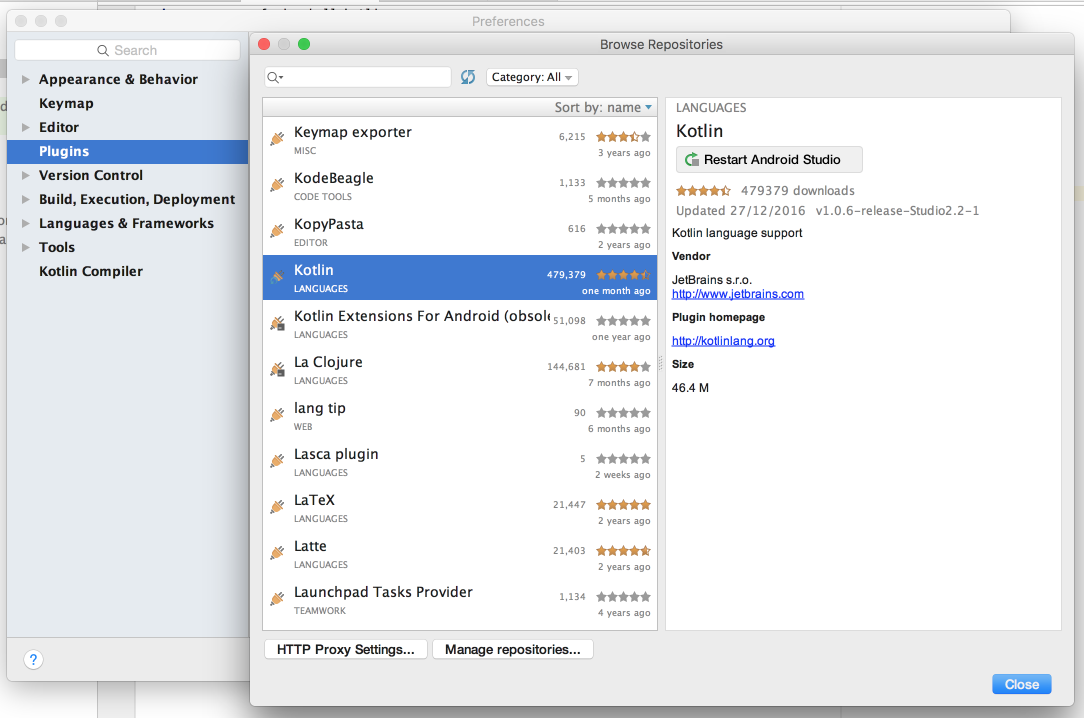
When the install is complete, you will need to restart Android Studio to apply the new plugin.
Just in case you’re using IntelliJ IDEA 15 or above, you’re in luck - Koltin plugin ships with the IDE.
Create a new Android project
Now that we have the plugin installed, let’s go ahead and create a new Android project - the usual way we would. Navigate to File > New > New Project and follow through project creation wizard. Select the “Create Empty Activity” option at the end.
For more information on creating an Android project, check out this guide https://developer.android.com/studio/projects/create-project.html.
Apply Kotlin Plugin to the project
Next step is to apply the Kotlin plugin to the project. There is an automated tool to do this but sometimes, the tool messes things up, so let’s just walk through the manual process of applying the plugin in our build.gradle files (both at the project level and the app-module level).
a. Add Kotlin Gradle Plugin
To configure the plugin, we first need to add the plugin to the root project’s build.gradle, same way it’s done for the Gradle plugin (automatically). Add the plugin to the dependencies closure in the project build.gradle file. The project build.gradle file looks like this:
buildscript {
    ext.kotlin_version = "1.0.6" // replace with the latest (stable) version: https://github.com/JetBrains/kotlin/releases/latest

    repositories {
        jcenter()
    }
    dependencies {
        classpath 'com.android.tools.build:gradle:2.2.3'
        classpath "org.jetbrains.kotlin:kotlin-gradle-plugin:$kotlin_version"
    }
}
Few notes about the block of code above:
- We created a variable
ext.kotlin_version.
The reason we have this is we may have other places in the project where we need to reference the Kotlin version, so it makes sense to “externalize” that value. You can check out this post about externalizing your dependencies versions using gradle extra properties for more info. - We placed this variable in the
buildscriptclosure. This is because, thebuildscriptis the entry point into this file when the project is being built. If we place the variable outside this closure, this variable won’t be available before the project is built, and the build will fail.
b. Apply the Kotlin Android Plugin
After adding the Kotlin Gradle plugin, the next step is to apply the plugin. To do this, we need to add apply plugin: kotlin-android to the app-module’s build.gradle file
apply plugin: 'com.android.application'
apply plugin: 'kotlin-android' // apply kotlin android plugin
Convert Activity Code from Java to Kotlin
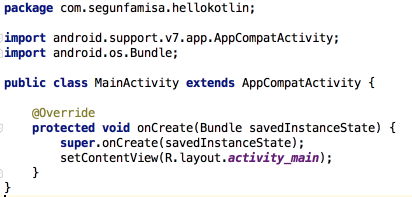
We’ve applied the plugin and setup all we need to, but our “Empty Activity” generated code is still in Java 🤔.
Luckily for us, the Kotlin plugin can help us convert our code from Java to Kotlin 😆.
Currently, our Java Activity looks like this:
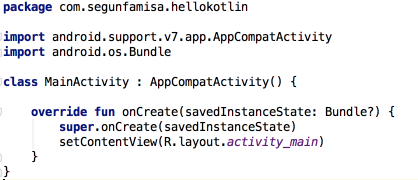
To do this, select the file and navigate to Code > Convert Java File to Kotlin File, or use the shortcut - Command + Alt + Shift + K (I believe you can replace Command with control if you’re on a PC).
After converting our code to Kotlin, our “empty activity” looks like this:
Bonus: Staying up to date with Kotlin versions
You’ve made it this far :). Let’s add a bonus tip.
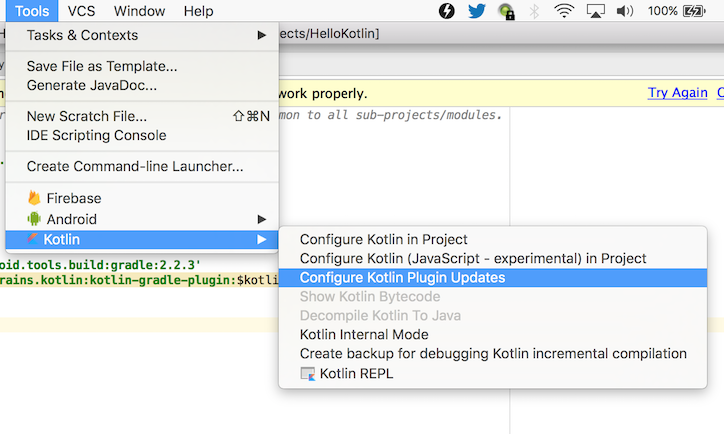
Kotlin is still heavily being worked on, and there are (frequent) fixes and updates. It’s generally a good idea to stay up to date with the new features and changes in the language. The Kotlin Android Studio plugin helps us manage the versions of Kotlin. If you navigate to Tools > Kotlin > Configure Kotlin Plugin Updates as shown in the screenshots below, you will be able to select the update channel - Stable, Early Access Preview - 1.0.x or Early Access Preview - 1.1 - which is currently the bleeding edge version :)
Further reading
There are a number of great resources scattered around the internet for learning Kotlin. Some of them are:
In future posts, I’ll be writing about some specific features of the language.
Thanks for reading this post, I am always open to questions, and comments. If you have any, kindly drop them in the comments section below or send me a tweet.
If you found this post useful, or know someone that may find it useful, please feel free to share.
Thank you!